Saturday, February 5, 2022

Vengeance Rising - Battle 4 - Tomb Kings (Dual Snakes) vs Beastmen (Gor Herd) - 4/1/12

Hey guys


Another battle report for your viewing against Beastmen.

My list:

Level 4 - Earthing Rod
Level 4 - Scroll (lore of light)
Necrotect - dragon bane gem, iron curse
20 Archers - Std
20 Archers
2 x 5 Horse Archers
4 chariots - Std, Mus
2 x 6 Necro Knights - FC
Casket
Hierotitan
2 x SSC

Opponents list (from memory)

Beastlord - Crown of Command, Blackened Plate, 4+ Ward, GW
Great Bray Shaman - Beasts
Bray Shaman - Shadow, Scroll
Bray Shaman - Shadow, Herdstone Shard
Wargor - Gnarled Hide, Beast Banner
2 x 5 Chaos Warhounds
Gor Herd - Approx 40-50 models
2 x Tuskgor Chariots
5 Ungor Raiders
Bestigor Herd - FC - Approx 30 models
Razorgor Chariot
3 x Razorgors

Spells

Hierophant - Desert Wind, Smiting, vengeance, Protection
Light - Pha's, Bironas, Speed of Light, Banishment
Lev 4 Shaman - Wissans, Spear, Curse, Flock of Doom
Both Level 1's take Miasma

Deployment:


I roll up first turn after deployment.

TK 1


Magic - 10PD vs 8DD
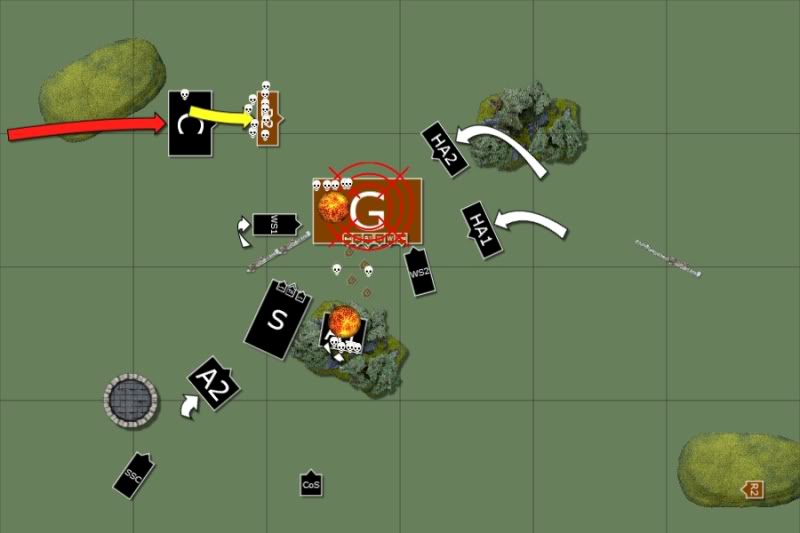
Desert wind goes off moving my western Necro Knights forward and the archers behind them and finally moving the Hierotitan again in a more central position.
I follow this up with banishment on the Tuskgor chariot however this is dispelled. I try for a light of death on the Razorgor chariot however this is also dispelled. Finally I throw my dice at smiting and my opponent burns his scroll to get rid of this.

Shooting

My Horse archers kill 3 Ungor who pass their panic check.

A well placed skull lands on the Gor wipng out 9 of them however they pass their checks.

Lastly my archers all aim at the ungor wiping out the unit and putting a wound on a level 1.

Not a bad start.


Beastmen 1


Both Level 1's scramble into the Gor unit for protection.

Magic - 6PD vs 2DD

Miasma is cast twice on the archers dropping their BS, now requiring 6's to hit.

Amber spear is failed to cast targetting the Hierotitan.


TK 2


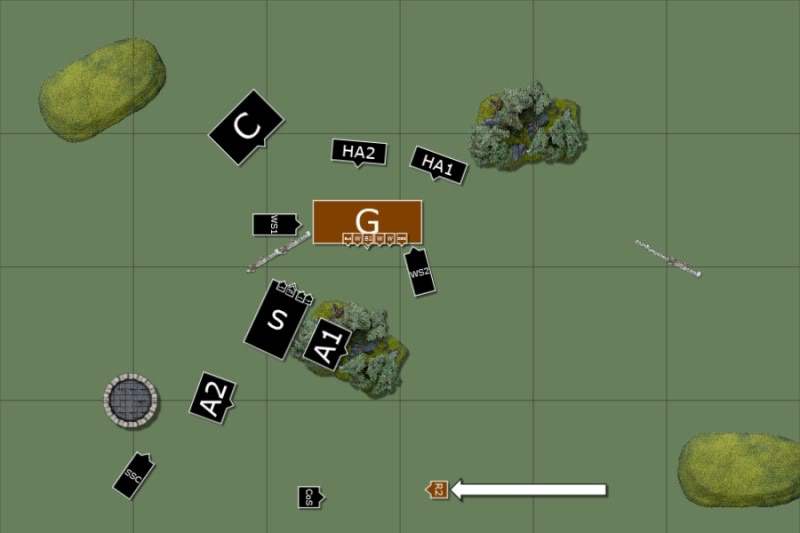
Chariots charge the pig on Eastern flank.

Magic - 10PD vs 5DD

I cast banishment on the Razorgor chariot however this yields no damage after 8 hits. I throw two dice at Vengeance on the Gor unit however this is dispelled. Light of Death fails to kill anything. Lastly I throw the remaining dice at a powered up Smiting which successfully goes through.

Shooting

The only thing worthy of note is the SSC kills 5 Gor and the Archers rack up 5 Gor kills as well.

Combat

After 9 Impact hits I manage to put 2 wounds on the chariot and take the same damage in return. This proves enough however to break the pig and I run him down taking me out of danger of a flank charge from the on lookers.


Beastmen 2


Charges

Razorgor Chariot + Tuskgor Chariot charge Horse archers.

Magic - 6PD vs 2DD

Once again Miasma is cast on the archers dropping BS.

Wissans fails to cast on the Gor.

Combat

Horse archers are smashed unsurprisingly. Units reform to face Necroknights.


TK 3


Charges

Hierotitan charges into the Razorgor.

Necroknights charge into Chaos hounds on the Western flank.

Magic - 9PD vs 3DD

Smiting is dispelled.

Light of Death puts a wound on the Eastern Tuskgor chariot and fails to jump.

I cast Pha's protection on the charging Knights and then throw 2 dice at Neru's Incantation of Protection on the Hierotitan rolling box cars. I roll up an 11 for the miscast result and not really want to reduce my level 4 I opt to re-roll and bingo I get a cascade! This results in my Hierophant getting sucked into the mysterous nether and 12 archers going with him. Further crumbling puts a single wound on the Hierotitan and the Eastern SSC is destroyed.

Shooting

Archers put 2 wounds on the flanking pig and the SSC drops another 4 gor after scattering.

Combat

Hierotitan puts 2 wounds on the pig however it holds.

The Necroknights plough through the dogs and crash into the Gor.


Beastmen 3


Razorgor charges into the Necro Knights

Tuskgor Chariot charges my chariots.

Magic - 7PD vs 2DD

Miasma is once again cast in the usual fashion.
Wissans is also attempted however I scroll this.
Curse goes through.

Combat

Tuskgor chariot kills the chariots.

Pig does 1 wound on the Hierotitan however I manage to swing and kill it reforming to face the East for next turn charge.

The Razorgor chariot puts 3 wounds on the Necroknights with impact hits and crew attacks and takes a single wound in return.

The Necroknights fighting the Gor challenge out the BSB who takes no damage and dishes out a single wound in return. The NK dish out 6 wounds on the unit, 1 wound on the Great Bray Shaman and take 7 wounds in return.


TK 4


SSC Crumbles. :(

Hierotitan charges the Chaos Hounds.

Magic - 11PD vs 6DD

I cast Pha's on the Necroknights agains.

Speed of Light is dispelled however and I sneak Birona's through onto them instead.

Light of Death kills the chariot on the flank.

Shooting

Archers take out the pig threatening the archers.

Combat

Hierotitan proceeds to do sweet FA to the pig holding it in place. At least it's consistent! :)

NecroKnights chop into the chariots with 3 wounds taking none in return but combat holds.

The challenge against the BSB continues with neither side gaining an advantage. The rest of the unit puts 7 wounds onto the gor and take 3 in return but this proves too much for them and they break running from the fight however the serpents prove to swift and the Gors are cut down in the withdrawal.


Beastmen 4


Chariot moves to support Razorgor chariot against Necroknights.

No magic - Hooray! :)

Combat

The Hierotitan takes a wound before destroying the dogs as they flee moving me closer to the Razorgor chariot.

The Necroknights take 2 wounds and hold combat.


TK 5


2 Horse archers crumble.

Hierotitan charges flank of Razorgor Chariot.

Necroknights with Bironas allows them to move a huge 14" to setup a rear charge onto the Bestigor next turn.

Magic - 7PD vs 3DD

Speed of light goes off onto the Necroknights engaged with the Razorgor Chariot.

Light of Death then proceeds to delete the remaining chariot.

Combat

Hierotitan slices through the Razorgor chariot and I reform to face the inevitable.


Beastmen 5


Bestigor charge into Hierotitan. I manage to put a single wound on the Wargor before he dispatches the Giant overrunning into the Necroknights.


TK 6


Remaining archers crumble and the Horse archers.

Necroknights charge into the rear of the Bestigor.

Magic - 12PD vs 6DD

I get a powered up Pha's protection off making the Knights -1 to hit however I fail to get speed of light through.

Combat

The bestigor fail their fear test hitting me on 6's which is always a good advantage! :) I challenge and the champion accepts who dishes out 3 wounds to the beatman dropping him. The warlord puts a wound on the snakes before taking one. In between the 2 units the Necroknights drop 9 of the beasts however they're steadfast and hang around.


Beastmen 6


Combat

The beastlord puts 2 wounds onto the snake riders before a fatal wound dispatches the beast leader dropping him into a pile of mangy fur. The Necroknights continue the carnage dropping a further 6 of the Bestigor and taking 4 wounds in return. With the loss of their leader and the continued damage the Bestigor turn tail and run but prove no match for the speed of the Necroserpents cutting down every last beast.


TK Victory.


Conclusion:

Wow, what a game. Firstly I want to thank Mark Wildman for the inspiration behind the list. I've never had much success at all running the Necroknights in any unit size and I certainly can see the advantages of running 2 units of 6. They're possibly the best thing in our list and even my opponent commented on how he was going to be fighting an uphill battle when he found out I was running two units of 6 of them.

The loss of the Hierophant on the second turn was a nightmare and possibly the worst case scenario, luckily the Level 4 light priest was the general so I didn't lose two birds with one stone. The loss of the Hierophant didn't really effect me that badly and although it would have been nice in the late game to get a wound or two back here and there and dish out more attacks but it probably would have just confused my spell casting a bit more.

The Necrotect saved 6 wounds through regen rolls on the Necroknights so certainly a worthwhile addition to the army. Keeping him tucked away like that behind the unit is the way to go.

On the chariots, it's such a shame one chariot took the unit out however I don't see what else I could have done differently on the Eastern flank. Perhaps sat them right back a few inches in and waited a few turns?

Horse archers were great however I have a tonne of room for improvement in using them.

Each magic phase was certainly a relentless endeavour for my opponent, I find low rolls are actually the best for Tomb Kings as you can 2 dice most spells with a level 4 and a Hierotitan backing it up and with a casket in tow and 2 channels you can really turn a low roll into a formidable magic phase that the enemy just can't tackle.

SSC's were great in pressuring the enemy and chipping ranks off the Gor, I was tempted to have a crack at dumping skulls onto the razorgor chariot but eventually decided against in and keep the wounds up onto the horde unit.

Well I appreciate any comments and critisms.

Next weekend I've got 3 games against Skaven, either Lizardmen/Dark Elves and probably Beastmen again.

Friday, February 4, 2022

Vengeance Rising - Battle 3 - Tomb Kings vs Beastmen (Re-match) - 11/3/12

Hey guys


Rematch against the Beastmen and a few changes to my list:

TK - mask, ward, GW
Hiero - level 4, nehek, rod
LP1 - level 1, death, Dispel Scroll
LP2 - level 1, death, powerstone, icon

4 x Chariots - Std, Flaming
2 x 20 archers
39 x warriors - FC, LA
2 x 5 Horse Archers
2 x Warsphinx - FB
Casket
Hierotitan
2 x SSC with skulls

Ops list:

Great Bray Shaman - WS10, Jade Dagger, 5+ Ward, Lore of Beasts
Beastlord - Black Plate, Stubborn
BSB - Beast Banner, gnarled hide
Wargor - Shield, Heavy Armour, ASF, Other Tricksters Shard
Wargor - XHW, HA
Wargor - GW, HA
58 Gor - FC, XHW
2 x Tuskgor Chariots
2 x 5 Dogs
5 Ungor Raiders
3 Razorgor
1 x Razorgor Chariot
24 Bestigor - FC Flaming

Spells:


Great Bray Shaman - Wissans, Amber Spear, Savage Beasts, Panns
Hierophant - Wind, veng, Smiting, Cursed Blades
LP1 - Spirit Leech
LP2 - Spirit Leech


Deployment:


TK won the roll off with a 6.

TK 1


Everything advances

Magic - 9PD vs 5 DD

2 x Spirit Leech on his Bray shaman and both fail to cast.
Vengence is dispelled.
I fail to cast Casket with two dice.

Shooting drops a single dog and a well placed SSC bomb takes out 5 Bestgor whilst the other scatters into a dog killing it and panicking it off the board.


Beastmen 1


Everything advances

Magic - 7PD vs 7DD

Amber Spear goes off and puts 4 wounds on the Hierotitan.
Wyssans Wildform goes IF and pops 3 Gors taking them up in toughness and strength.

TK 2


Charges:

Chariots into Pig
Horse Archers into Dogs

Magic - 6PD vs 4DD
2 x Spirit Leech fail and one is dispelled.
Vengeance is cast on remaining dice on the Gor and goes through sticking them in place.

Shooting

SSC does a single wound on the Gor who pass the panic test. The other SSC scatters.

The archers do a single wound on the pig and 2 ungor drop to the archers closest to them.

Combat

The chariots do 2 wounds via impact hits on the razorgor and then the crew proceed to chop it to bits and overrunning a healthy 11" out of the arc of the onlooking chariot.

Horse archers vs dogs - Dog are annihilated and the archers overrun 9 and 8 inches.


Beastmen 2


Some repositions to get into better charge opportunities for turn 3.

Magic - 10PD vs 5DD

Wyssans goes through on the gor
I fail to stop Amber spear which goes through the head of the Hierotitan crumbling it to ruin. :(
Savage Beast goes off and then Pans pelt on the BSB.

TK 3


Warsphinx charges the chariot who holds.

Magic - 11PD vs 5DD

2 x Spirit Leeches are dispelled and a single fail.
Light of Death goes off and kills a chariot and a pig but nearby units pass panic tests. :)
vengeance is successfully cast again on the Gors reducing them to Movement 2.

Shooting

SSC onto the razorgor chariot threatning my chariots scatters and misses however the second hits smack on target and splinters the chariot destroying it outright. Timing couldn't have been better on that!

2 Bestigor drop to bow fire as well as a single Ungor.

Combat

The Warsphinx shatters the chariot with no damage in return, this is enough to panic the Bestigors nearby who flee in a prime position for the chariots to charge.

A very productive turn with the clearing of nearly all of the opponents chaff units.

Beastmen 3


Razorgor charges SSC.

Bestigor rally to face the chariots.

Magic - 7PD vs 5DD

Wyssans goes off.
Amber spear fails to cast.

Combat

Pig kills SSC and reforms to face Casket.

TK 4


Chariots charge Bestigor

Magic - 12PD vs 6DD

Spirit Leech - No damage
Spirit Leech - IF - No damage and Liche Priest loses his levels. :(
Vengeance - IF - result kills 7 archers.

Shooting

SSC - kills 4 Gor (This caused a panic test which was failed but then re-rolled with BSB, had I had my King a few inches closer that would have sealed the deal then!)
Archers - 1 Gor
Ungor drop to bow fire as well.

Combat

Chariots vs Bestigor

Impact Hits cause 7 unsaved wounds and the crew manage to kill a further 3. I take 3 wounds back in return breaking the Bestigor who flee 7" however the chariots only roll a 4" for pursuit.


Beastmen 4


Bestigor Rally.

Razorgor moves towards Casket of Souls.

Magic - 11PD vs 7DD

Wyssans Wildform is dispelled.
Savage Beast fails.

TK 5


Chariots charge into the Bestigor to finish what they started!

Magic - 9PD vs 4DD

Spirit Leech fails to yield any wounds.
I throw 6 dice at Vengeance and get it off via IF pinning the Gor once again.

Shooting

Both the Warsphinxes breath fire onto the Gors to gain some casualties before the oncoming combat in Turn 6, have to try and remove those ranks to negate stubborn. They gain 13 wounds between them and the archers put a further 3 wounds.

SSC - misses the pig.

Combat

Bestigor are destroyed via impact hit and crew and I reform to face the Gor for the turn 6 charge.


Beastmen 5


Razorgor moves closer to the casket.

Magic - 8PD vs 6DD

Wyssans is dispelled.
Savage - Scroll


TK 6


Warsphinxes charge and the chariots charge into the Gor.

Magic - 8PD vs 5DD

Smiting is dispelled
cursed Blades goes off effecting all units regaining some archers and a chariot.

Shooting

SSC hits the remaining pig and puts 2 wounds on it. Bowfire from the army finish off the beast.

Combat

Impact hits from the chariots cause 8 wounds. The beastmen characters make way to be in contact with the chariots and warsphinxes putting 9 wounds on the chariots leaving one left! The unit puts 3 wounds on the warsphinx.

The warsphinx crew Killing blow the BSB and do a single wound to the unit. The chariot crew Killing blow the wargor with a great weapon. Second Warsphinx does nothing.

Thunderstomp yields another 4 wounds.

Gors are still stubborn and hold.

Beastmen 6


Magic - 10PD vs 6DD

Wyssans goes through as I save all my dispel dice to successfully dispel Savage Beast.

Combat

Chariots are destroyed by characters. The gors put another wound on the wounded Warsphinx.

Warsphinxes do 2 more wounds on the unit and a further 2 from thunderstomps.

He still has more ranks than I however the gods bless me and he rolls an 11. I pursue and crush them into the ground.

Result - Massacre to the Tomb Kings!

Conclusion


Well even though I walked away with a very convincing win I was still angry at myself for my King placement. Had I moved him up a turn earlier the game quiet possibly would have been over a turn earlier.

Simple plan was to envelope his flanks and just sit the warsphinxes to block his main combat unit whilst everything removed the chaff and it went into plan full swing.

Spirit leech was just frustrating and I don't know where I stand with it. I was getting it off, just simply wasn't rolling high enough on the dice to cause damage.

Incantation of Vengeance is simply amazing against hordes. Basically pinning them in place and my opponent just couldn't afford to move/solo charge as it would mean dangerous terrain tests and statistically he was going to fail 18 of them which would certainly hurt.

So once again a game where the King really didn't do anything. I didn't charge the skellies in as they would have leaked combat resolution hurting my constructs so I wasn't even thinking about it.

My opponents list is as he said a severe one trick pony however it does that trick very well. Once the spells are up and buffing the unit it takes a lot to take it down. I was extremely lucky in the fact it was me who was dictating his movement so I had the upper hand.

Thinking ahead to the next game I'm entertaining the following changes:

Dropping the King either for a prince or nothing at all. The mask is just to situational I'm starting to think and really only solidly effects a few armies and in order for it to work you have to be winning the combat which for me seems difficult.

Death priests - sheer frustration, admittedly the dice rolls were the culprit however if the King is going then these guys will follow as they only are there to take advantage of his Leadership. Thinking of replacing them with 2 x Level 2 Light Priests.

Warriors - Don't really need a bunker without a king so perhaps swap these out for more archers and/or chariots?

Straight away I was thinking about the inclusion of Knights in this list and against this particular army they would have just bounced. The warsphinxes were certainly the much needed addition in this list I feel.

Everything else was good for once. ;)

Look forward to hearing everyones thoughts/feelings/doubtful points.


Thursday, February 3, 2022

Vengeance Rising - Battle 2 - Tomb Kings vs Beastmen - 3/3/12

Hey guys


After sometime and contemplating and much inspiration from Sleboda I decided to have another crack at the Tomb Kings. I've been very interested in seeing how the death priest setups go and this list was a bit of an experiment as far as that goes.

Please forgive any errors in the battle report and getting the map to scale and everything else can be a royal pain in the arse.

TK - mask, ward, GW
Hiero - level 2, nehek, rod
LP1 - level 2, death, enphils
LP2 - level 2, death, powerstone

4 x Chariots - Std, Flaming
4 x 10 archers
41 x warriors - FC
2 x 5 Horse Archers

4 x Necroknights with mus
3 x Stalkers

Casket
Hierotitan
2 x SSC with skulls

Ops list:

Great Bray Shaman - WS10, Jade Dagger, 5+ Ward, Lore of Beasts
Beastlord - Black Plate, Stubborn
BSB - Beast Banner, gnarled hide
Wargor - Shield, Heavy Armour, ASF, Other Tricksters Shard
Wargor - XHW, HA
Wargor - GW, HA
58 Gor - FC, XHW
2 x Tuskgor Chariots
2 x 5 Dogs
5 Ungor Raiders
3 Razorgor
1 x Razorgor Chariot
24 Bestigor - FC Flaming

A tough list centred around the tactic of Savage Beasts to sup up all the characters. The other headache for me was the entire gor unit would have a 4+ ward save against the SSC. :( This was going to be up hill all the way.

Spells:

Great Bray Shaman - Wissans, Amber Spear, Savage Beasts, Transformation
Hierophant - Skullstorm, vengeance
LP1 - Spirit Leech, Doom & Darkness
LP2 - Soulblight, Fate of Bjuna

Deployment:


Beasts won the roll off easily having the +1.

Beastmen 1

Everything advances.

Magic - 12 PD vs 6 DD

Wissans Wildform is successfully cast on the Gor.
Amber Spear goes off IF taking two wounds off the Hierotitan. The miscast result is a dimensional cascade killing 15 gor and putting a wound on the Shaman. They pass their panic test. Pool loses remaining power dice.

TK 1

Magic - 7PD vs 3 DD

Soulblight on Razorgor 1
Vengenace goes IF on the Gor, miscast rolls a dimensional cascade which I re-roll taking no damage.
Doom & Darkness - Centre Razorgor

Shooting

Horse Archers drop a dog on the east.
2 wounds are taken on the centre pig from the archers.
Chariots + Archers kill the soulblighted pig causing the nearby pig to panic and run 11".
One SSC misfires whilst the second lands and puts 4 wounds on the Razorgor chariot.

Beastmen 2


Charges

East chariot into the archers.
Razorgor and chariot into the archers. (passes difficult terrain test)
Dogs into flank of archers
Razorgor fails to charge archers.

Razorgor runs to table edge.

Magic - 9PD vs 6DD

Amber Spear - Hierotitan which I dispel
Wissans wildform goes off on the gor again
Savage beast on the BSB fails to cast.

Shooting - nil

Combat

chariot + Pig destroy archers however the pig fails to overrun to far.
Dogs miss archers and archers kill a single dog reforming to face.
Eastern chariot kills 3 archers and they do a single wound in return.

TK 2

No stalkers

Charges

Tomb King charges into chariot flank
Hierotitan into chariot (poor map)

Magic - 12PD vs 5DD

Soulblight on the Bestigor
Vengence on the gor is dispelled

Shooting - Horse archers take out another dog
SSC - Miss
SSC - kills 5 bestigor - pass panic

Combat

Eastern chariot kills 1 archer, the Hierotitan crushes the chariot and reforms.
Centre chariot kills 4 archers, it takes 3 wounds in return from the king and holds. Not what I wanted. :(
Archers do a single wound to a dog which is enough to break them and causing the pig nearby to panic.

Beastmen 3


Pig charges king + archers combat

Pig flees off table, central pig flees behind Gor, dogs continue to flee.

Magic - 4PD vs 3DD

Wildform on Gor, fail to dispel
Amber Spear on SSC doing 2 wounds.

Combat

Razorgor chariot kills archers, king kills chariot and pops. Yay.

TK 3


Stalkers arrive.

Magic - 11PD vs 5 DD

Skullstorm moves 8" doing 1 wound on snakes.
Vengeance is dispelled on gor
Hierotitan Spirit Leeches an Ungor gaining 2 PD
Liche Priest Spirit Leeches an Ungor gaining 1 PD
I crack the powerstone and cast fate of Bjuna on an ungor causing 5 wounds and gaining 2 PD, this miscasts and both death priests take a wound.
casket is dispelled.

Shooting

Horse archers drop 2 dogs
Stalkers put a wound on themselves and take down a single gor.
SSC's miss.

Beast 4


Ungor charge warriors
Gor charge Knights over skullstorm taking 5 wounds and characters make way to all be in base to base contact with knights.

Magic

Savage beast goes off.

Combat

Knights are utterly destroyed.

Skellies kill ungor.

TK 4


No charges

Magic - 7PD vs 2DD

Skullstorm moves and kills 9 gor and 4 bestigor.
Spirit Leech from Hiero on general nets 1 wound.
Fat of Bjuna puts 3 wounds on the general netting +1PD.
Soulblight goes off on the gors.

Shooting

SSC does 9 wounds on gors
SSC scatters killing Liche Priest.
Stalkers do 2 wounds on Bestigor.

Beastmen 5

Gor charge Hierotitan
Razorgor chariot into flank of warriors

Dog Rally

Magic - 8PD vs 5 DD

Forgot about Skullstorm
Wissans on gor
Beasts - dispelled

Combat

2 Wound on Hierotitan, HT does 2 back but pops. Overrun into skellies, between the razorgor chariot and gors there are 11 skeleton warriors left standing.

TK 5


Archers charge pig

Magic - 5PD vs 3DD

Skullstorm kills 4 Bestigor
Veng - dispelled

Shooting

Stalkers take 3 wounds, kill 3 Bestigor.
Horse Archers kill a dog.
SSC Nil

Combat

Skellies dead. Archers pop.

Beastmen 6


Razorgor chariot charges SSC.
Gor charge archers

Can't remember what happened with dogs and razorgor at this stage.

Magic - 6PD vs 3 DD

Skullstorm misfires.
Wissans goes off.
Savage Beasts goes off.

Combat

Everything pops.

TK 6


Stalkers and horse archers charge remaining Bestigor.

Magic - 7 PD vs 3 DD

Skullstorm fails
Spirit Leech fails

Combat

Kill bestigor.

Result - Victory to Beastmen.

Well there you have it. I don't have a lot of positive things to say at all about the game. I shouldn't have charged the king into kill the chariot however statistically it should have died/ran away allowing me to overrun into the pig. Would that have caused a huge difference in the game? probably not.

It's clear from this game and every other game I've played I'm just not competent at using necroknights and they just do nothing but piss me off so I'm going to get rid of them.

Magic setup - I did enjoy the magic phases though and having the 2 x death priests was pretty good although I don't think the Enphils Kanobi will ever get used/allowed through so I might look at dropping that. Funnily enough the spell that gets the most crap being skullstorm took out a total of 17 models which was pretty good. Have to remember that it moves in the ops magic phase as well however. Really need a level 4 though purely for spell selection as having no augments was not fun.

Tomb King - The mask didn't do a thing which really surprised me as Beasts is probably one army which it should really shine, is it worth the 60 points? I do not think so. I could have possibly made my king more hitty to take out the chariot but who knows.

Stalkers - are arse. Yeah sure they have some fantastic match ups but for the most part they're junk I think and will be dropping them.

Necroknights - Yep, It's clear I can't use them. Perhaps in a Lore of light list I would run them but I think a warsphinx suits this list much better.

Chariots - I used my chariots like shit, hoping to get vengence off a few more times to slow down his gor but it just wasn't going to happen.

Hierotitan was great and really pushed a lot of spells over the limits and made my opponent think.

SSC were effective however it was never going to dent the Gors with a 4+ ward against flaming so it kind of went against them straight away.

No doubt I'll chime in more comments in the following days.

Wednesday, February 2, 2022

Vengeance Rising - Introduction & Battle 1 - 11/2/2012

Welcome to the re-publication of my old Warhammer 8th edition battle reports. 

It was February 2012 and I decided to begin an epic journey to publish my battle reports to the greater Warhammer community for some simple documentation. I was hoping to become a tactical genius at the end of it all of course, but what really happened was I switched armies a few times, painted a heap more models, won a tournament, lost many more and developed an intimate understanding of what has become my favourite faction in the Warhammer lore.

I went on to surpass the 100 battle reports and through some friendly reminders from a certain member on the forum I was gifted with the title 'Centurion' and the cool post that followed:

"As far as the eye could see the fields were littered with the bodies of the fallen. From the mountains in the east to the shining seas in the west a layer of dead spoke to the gods louder than any prayer. And amidst all that carnage a warrior stood alone. An oath he had taken and an oath he had fulfilled. He battled for a century, where ever, when ever and against who ever crossed his path leaving all the challengers in the dirt. From heaven high and hell below gods approached dipping their blades in salute. The warrior cared not for glory and accolades, a cold smirk dancing on his lips. A salute was given and then he charged. Mortals had fallen, immortality awaited!"

"Congratulations Jimmy, your dedication have been an inspiration to many. May your arm stay strong and fortune favours you!"

It was very humbling to know people read the content I was producing. Fast forward to 7 years after my last battle report was posted and e-mails from Photobucket threatening to delete all my content, I figured it was time to immortalise the content somewhere, rather than it be lost to the black holes such was the fate of 8th edition.

It all begun on the Ultuan.net forums with a simple post:

"Hi All

Well after a few interesting ups and downs with the Tomb Kings I’m just getting little enjoyment out of them so for the time being I’m getting back to the High Elves for some fun and games whilst painting my Ogres and Tomb Kings (maybe in that order!). I’m jumping on the band wagon and creating somewhat of a journal of upcoming battles.

The basic aim of this journal is to document 100 of my games, gather thoughts and feelings whilst playing and pre/post game commentary noting key areas to improve on and areas to watch out for in the next game. Obviously this is a long term project but I’m hoping to remain active enough in the community maintaining it with regular updates.

At the end of the day this is purely about gaining more experience with my favourite armies in Warhammer and hopefully becoming a much better player during the course of it all.

I’m taking inspiration from a tonne of members here who contribute on a regular basis including but not limited to Curu, Brewmaster, SpellArcher, Swordmaster, Seredain, Elithmar, Bolt Thrower, and rdghuizing just to name a few.

I'm coming up with a good account of Warhammer Battle Reports and I'm sure I'll end up surpassing the 100 mark."

---

Hey guys

Finally a battle to report!

High Elves vs Empire. I got to my mates house and he presented me with the following Empire 'coven of light' list, wow what a challenge to begin with and straight away I felt like I was on the back foot!

My list for ease:


Level 4 AM – Shadow Lore, Book
Level 2 – High Lore, Seerstaff, Flames of the Phoenix, Vaul’s Unmaking
BSB – GW, 2+ re-rollable
29 Spearelves – FC
20 Archers – FC, flaming
10 Archers – Mus
5 Dragon Princes - Mus
20 Phoenix Guard – FC, Banner of Sorcery
29 White Lions – FC, Standard of Balance
2 Great Eagles

2499 points

Empire list:


Archlector on War Altar, with Great Weapon, Dawn Armour, VHS.
Wizard Lord of Life, lvl 4. Seal of Destruction, Immune to Panic Item
Wizard w/ Dispel Scroll
Wizard w/ Power stone (got banishment)
Wizard w/ Channelling Staff
BSB w/ Fullplate, Flaming Banner
Captain on Peg, w/ Lance, Pistol, Full Plate, Charmed Shield, Aldreds Casket of Sorcery.
40 Halberdiers FC
18 Xbows, champ muso
20 Swordsman FC
5 Flaggies w/ Prophet
10 Knights Full Command
Great Cannon
Great Cannon
Stank
5 Flaggies w/ Prophet.


So the idea is the walter hangs around the level 1's who are all bunkered in the Swordmen for protection coupled with a life mage to heal wounds from miscasts. So straight away the 3 big threats for me identified were the War Alter, the Steam Tank and the Coven of Light.

Pre-game thoughts:

This army had 3 components that could really dismantle my army and cause huge headaches, firstly the coven of light and the war alters ability for all of the light lore which could potentially turn the mediocre combat blocks into potent weapons, the steam tank which can tie up and grind nearly anything in the game and of course the coven of light sitting nicely back belting out S7 banishments on my Phoenix Guard to wittle the numbers down.

The other headache would be the captain on pegasus heading for my Archmage to destroy spells. If I could carefully place my level 2 or even use smoke and mirrors to switch and have a good shot at Vaul's then it would make a difference however it was going to be uphill purely because of the amount of channels my opponent was getting, the extra dispel dice from the Archlector and lastly the ability to dispel two spells and possibly destroy one!

This was going to be tough. I'd never first hand witnessed the 'congo' line and it's looking like a solid way to tie up enemy units with the flaggies, the unit matyrs and either draws combat or challenges so only the champion can be killed. The key here is to missile them to death or get a flank and destroy them but with so many threats I couldn't help but feel my opponent wasn't sharing my concerns!

Spell selection:

Archmage - Pit, Miasma, Enfeebling, Pendulum
Mage - Vauls, Flames of the Phoenix, Drain Magic

I didn't know what I was thinking here with taking Enfeebling as I had the opportunity to take withering instead which could have proved useful in combination with Flames of the Phoenix. Will remember for next time!

Level 3 - Earthblood, Throne, Flesh to Stone
Level 1 - Banishment
Level 1 - Gaze
Level 1 - Gaze
Level 1 - Gaze

Clearly the light wizards were mainly there to add strength to the banishment from the War Alter however seeing as one actually got it for spell selection aswell would prove to be problematic no doubt with double the chances of really causing some problems for the Phoenix guard!

Deployment:

I managed to win the roll off with a comfortable +2 to the dice roll and opted to take the first turn. Just a quick note, in error I put the High Mage in the smaller archer unit however he was always in the large archer unit however this doesn't impact the battle at all and in my turn 2 he's shown as switching units.

High Elves 1:

No charges

Magic - 3+2+1 (9PD vs 8 DD)

The first threat I identify that can really foil my plans is a bus of knights hitting me in the flank so I figure I need to get rid of them. I consult the wonderful chart Curu recently uncovered for me and throw 4 dice at Miasma reducing the knights initiative by 3 (I1!) with a roll of doubles. I back it up with a large Pit which lands bang on target on the knights leaving the lone standard who passes his panic test. I did roll 2 x 6's on the casting roll and this detonation kills 5 PG and puts a wound on the AM. A good trade off and a great start to the game for me. I could only hope my luck would hold consistent!


Empire 1:

No charges

Lone knight moves away to preserve the points of the entire unit so I'd have to try and take him out later in the game with either bow fire or a pendulum/pit.

Most of the enemy stays in place however the stank and captain move around the flank ready to envelope. Flaggies move up.

Magic - 3+2+1 (Empire channel)

Throne of vines goes up and I allow this through. Banishment is cast and I fail to dispel and it takes out 3 dragon princes however pass their panic test and I think how am I going to make use of them and have them still count for something towards the game.

Shooting

Eastern cannon shoots at the PG however it doesn't bounce and misses. The second cannon however targets the DP but falls short and kills 3 WL instead.

The crossbowmen add a further death to the WL.


High Elves 2:

No charges

Archers enter the building for better position and some protection. Eagle setups flank charge on cannon.

Magic - 6+4+3 (12PD vs 9DD)

So a critical phase with another opportunity to remove a huge threat in the game being the juicy coven of light bunker. Time to get to work! I immediately dispel Throne of vines with 2 dice successfully. Opted to do this first rather than miscast with other spells and potentially lose dice. I throw 5D6 at Miasma and don't roll any doubles and my opponent dispels this. I use my last 5 to throw at Pit however I fail to meet the casting value!

This can really upset the plan!

Shooting

The archers drop 2 flagellants.

A less than impressive turn and it was beginning to feel like Turn 1 was going to be the high point of the game!!


Empire 2:

No charges

Knight moves further away. Stank move in closer and the Captain moves in to steal a spell!

Magic - 6+4 (10PD vs 6 DD)

The captain rolls a 4+ and randomly steals pendulum, so that takes 50% of my magical options for dealing with the steam tank. Damn!

Burning gaze is cast on my archers in the building twice which sees 6 of their number toast however I pass the following panic test.

Banishment is cast on 6D6 and I manage to dispel this and then my opponent reveals the powerstone using this to cast banishment again on the PG however fails to meet the casting value thankfully for me!

Shooting

The steam tank engineer drops a WL with a pistol shot. The crossbowmen fail to wound the Western Eagle.

The eastern cannon easily destroys the Great eagle threatning the warmachine line whilst the second cannon shot harmlessly bounces off a Phoenix Guard.


High Elves 3:

After much thinking I decide to declare a charge with my BSB onto the Peg rider to either kill him or get him out of range of stealing another spell. My opponent elects to flee (rolling 4"!!) with him so I re-direct into the flagellants.

I move the archers out of the building to take out the cannon or tempt my opponent to waste a round of shooting on them. The White Lions reform into 6wide to get through gap. Dragon princes move to attempt to block the steam tank from charging the BSB/White Lions in the flank. Phoenix guard march hard to charge next turn.

Magic - 6+1+3 = 10PD vs 9DD

A critical magic phase and I spend a lot of time weighing up what threat to attempt to remove first with the options being throwing miasma + pit at the swordmen bunker or just throwing a pit at the steam tank. I end up opting for the swordsmen as I feel I can delay the steam tank with the dragon princes for a turn at least and I want some Phoenix guard left to get into combat and I don't feel them taking punishment from banishment would help in the war effort!

I throw 5D6 at Miasma and fail the doubles so it is scrolled immediately. I back it up with 5D6 for a large pit and I fail to meet the casting value! I manage to hold my tongue though and don't have an aggressive outburst so for me that's a win in itself! :)

Shooting

The archers put a single wound on the eastern cannon.

Combat

The flaggies martyr killing 3 of them and leaving the prophet who is promptly dispatched by the BSB of course this leaves me in a bad situation in that I overrun and face a round of punishment or I reform and risk a charge from a steam tank. I opt to overrun and roll a healthy 11" taking me closer to the enemy line and of course the oncoming wave of crossbow bolts!


Empire 3:

No charges (surprisingly)

Flaggies move to block WL, Stank moves to position next turn charge against PG. War Alter moves to block the flank of crossbowmen from eagle charge.

Magic - 5+2+1 = 8PD vs 5 DD

Captain fails to steal a spell thankfully!

Wizard casts banishment on the PG and I throw all my dice at it dispelling however it goes off again with the War Alter and 4 PG drop.

Shooting aka "The Nuln guide to killing a BSB"

So I had already envisioned some half arsed plan on how to proceed without the BSB before my opponent starts shooting away. The cannon opens up on the BSB hitting him easily and op rolls to wound and then the amount of wounds.....1. Grapeshot with the second cannon, 10 hits, 2 wounding and I save both.

The engineer adds his pistol shots however the Caledor armour proves too much for the blackpowder weapons and between the crossbows he proceeds to emerge after the smoke clears and the proud standard of Ulthuan flaps in the wind. Wow! Statistically I think I just beat the odds by a large margin.


High Elves 4:

Charges:

- Archers into the eastern cannon
- BSB into the western cannon
- Dragon Princes into Halberdiers
- Spearelves + White Lions into the Flaggies
- Phoenix Guard into the Swordsmen
- Archers into Captain (keep in mind this combat was much more central and not as close to any others!)

Magic - 5+4+3 = 12PD vs 8DD

So two sucky magic phases in a row, let's see if this one could stack the odds in my favour!

It's time to get rid of that steam tank otherwise it could really tip the game back into my ops favour. I throw 5D6 at it miscasting sucking the Steam Tank into oblivion however another S10 template strikes taking out some Swordsmen, another wound on the AM and dropping a PG. I use smoke and mirrors here to swap the position of the BSB with the AM in an attempt to give me better odds at doing damage in the combat and hoping the cannon crew have never used a sword before!

I only have a single dice left and throw it at Miasma however this is dispelled easily.

No shooting

Combat

Archers vs Cannon

The archers easily destroy the crew and reform to face the West to support their general next turn.

White Lions + Spearelves vs Flaggies

WL Champ kills the prophet and the Spearelves dispatch the remaining zealots reforming to face the Halberdiers.

Dragon Princes vs Halberdiers

The dragon princes clearly enraged with the loss of their kin skewer 4 bodies and their steeds stomp a further 2, I lose one in return and win the combat which I wasn't expecting and the unit holds.

Archers vs Captain

I declare a challenge with the archer champion to delay the death of the Mage and secondly because I should win the combat for a few turns before the stomps and pegasus attacks start tipping the combat in his favour, obviously I fail to wound and the captain makes short work of the champion however I win the combat and reform into 4 ranks.

PG + BSB vs Swordsmen + Wizards

I delcare a challenge with my champion and he accepts with his wizard lord and both proceed to break dance rather than fight causing no wounds. Not impressed!

The BSB promptly kills a wizard. The PG drop 5 swordsmen including the champion and I take nil damage in return however the unit holds on steadfast.

Archmage vs Cannon

I was already wincing expecting my AM to be slotted however his agility training paid off as the cannon crew couldn't land a blow on the nimble elf, now just to hold on for one more turn before reinforcements arrive!


Empire 4:

Charges

- Crossbowmen into PG flank

Magic - 2+2 - No steal!

Regrowth goes off healing the champion on the Swordsmen and 2 troops. Speed of light fails to meet the casting value.

Combat

Dragon Princes vs Halberdiers

The lone DP kills the unit champion and then falls in return.

Archers vs Captain

Once again I need to have my best chance at winning this combat so my Mage steps up to challenge and once again meets a sword to the neck for his troubles but buying valuable time for the unit. The captain continues to hold.


PG + BSB vs Swordsmen + Wizards + Crossbowmen + BSB

In the continuing challenge the break dance off continues with neither side crumbling to the encore of 'It's raining men', what a shame. :(

The BSB majorly depressed with the dancing slots 3 Crossbowmen opting for the non parry easy wounds. The PG kill a further 5 swordsmen including the champion and take 2 casualties in return. I win the combat however it doesn't shift the state of affairs. (Due to the champion being alive and the Wizard Lord I was unable to target the Level 1 wizards!)

Archmage vs Cannon

The Hoeth master manages to slice the throat of a cannon crew dropping him immediately however the remaining crewman holds firm.


High Elves 5:

Charges

- Archers into Cannon
- Spearelves into Halberdiers - elect to hold
- White Lions into Halberdiers - elect to flee
- Great Eagle into Crossbowmen (poor illustration)

Magic - 6+1+1 (8PD vs 9 DD)

Another critical phase and hoping I could turn the tide of the combats. I cast enfeebling foe on the Pegasus Captain and ping his Strength value to 3, not ideal but better than being wounded on a 3+. I also attempt Miasma but this is dispelled.

Combat

Archmage + Archers vs Cannon

Between the archers and Archmage the last crew member is viciously killed and the archmage prevents the archers from overrunning. Damn!

Archers vs Captain

The archers do no wounds with his 2+ save however I receive 2 wounds in return with the now S3 hits which allows me to win on a musician however the captain holds refusing to give ground.

PG + BSB vs Swordsmen + Wizards + Crossbowmen + BSB

The mega dance off continues however the Wizard lord gets in a sneaky dagger kill to the neck dropping the champion. Oh dear how embarrassing.

The BSB kills 2 crossbowmen and the PG on the flank drops a further 1.

The PG kill a wizard and leave another on a single wound. The Swordsmen kill a PG in retaliation giggling as the Eagle misses with everything and fails to stomp and the combat holds.


Empire 5:

No charges - Reason being the opponent was going to try and cast banishment on the Archmage netting him some big points.

The Halberdiers rally and face the spearelves.

Magic - 1+1 (1PD vs 1DD)

Wow, so this is what happens when you bank on a magic phase coming through for you. I dispel banishment very thankfully.

Combat

Archers vs Captain

The archers do nothing and take a further 2 casualties in response. The combat holds.

PG + BSB vs Swordsmen + Wizards + Crossbowmen + BSB

BSB challenges and the Crossbowmen champ steps up to have his head removed. The Phoenix guard drop another crossbowmen and drop the wizard lord.

The swordsmen drop another PG.

Down to the decider, the eagle misses with his attacks however a lucky stomp comes through and the opponents re-rollable break test isn't enough to prevent their nerves from falling through and the Eagle catches the unit in the following pursuit!


High Elves 6:

No charges

I opt to conserve points and under no circumstance do I even want to toy with the possibility of losing a combat against the Halberdiers.

The AM joins the unit of archers to face the lone knight however in the magic phase I realised I made an error and should have moved him to the other side of the archers so the knight couldn't have hit combat and directed attacks at him.

Magic - 3+2+2 (7PD vs 5DD)

Time to get rid of this War Alter. I throw 2D6 at Miasma and get 2 x 4's and drop the Initiative by 3. I then throw 4D6 at a small pit getting it off and sinking the war alter and Arch Lector into the afterlife.

My opponent dispels Enfeebling Foe.

Shooting

Archers bounce off the lone knight.

Combat

Archers vs Captain

Captain drops another 2 archers and the combat holds.

PG + BSB vs Swordsmen + Wizards

Swordsmen fail their fear test.

The BSB is challenged by the wizard and puts 3W into the resolution pool.

The PG drop another 4 swordsmen and they fail to do any damage back turning tail and exposing themselves to Elven fury and getting cut down in the chase.

This proceeds to be the perfect outcome for me and the PG block the Knight from charging the AM.


Empire 6

Charges

- Knight onto Archers - fail

Combat

Archers vs Captain

Captain drops another 2 archers however he breaks and is pursued although I can't remember if I caught him or not however I'm sure this didn't change the outcome of the game.


Result - Victory to the High Elves!

Unit of the match:

Honours clearly go to the Archmage

In total he was responsible for taking out the following:

Disabling the Knight Bus
Destroying the Steam Tank (300 points)
Destroying the War Alter (250+ points)

So out of the 3 major threats I identified at the beginning of the game I was able to neuter 2 with magic, even though the steam tank didn't make a difference to the game when I missed out in the earlier magic phases had I not nailed it in turn 4 I'm sure it would have wrecked havoc upon my White Lions and possibly entered the combat with the Archers vs Captain swinging it in his favour.

Conclusion:

Well a great game to get back into the swing of things. So how did I feel I performed? Well I won the game however that still doesn't answer the question. Obviously my opponent missed out on a massive opportunity to sink my Book of Hoeth Archmage into the ground but he only rolled 1+1 for winds which was just bad luck or good luck for me. Deployment was ok. Should I have perhaps concentrated on removing Casket? Maybe however then this directly took away my ability to damage and even intimidate the opponent with the thought of a pit lurking around. I was very lucky that my Pit's didn't scatter at all so no doubt next game they'll be all over the map but wait and see.

The major gripe I have is that the White Lions didn't see combat, an insult to the entire Province of Chrace! The Flagellants really put them into a poor position that I wasn't able to recover from and I couldn't even get a flank charge on the captain due to having to maximise models in base to base so it closed the line of sight off to the Captains flank.

As for list changes, having more archers instead of spearelves could have proved useful in causing more casualties early game and even reducing the numbers of the halberdiers significantly. Secondly this raises the question that the WHite Lions could have possibly got into combat as you'd hope another block of archers would have taken out the congo line of Flagellants allowing them free roam to charge a target. Bit of food for thought though as taking them coupled with Mindrazor just pours out a ridiculous amount of high strength attacks that leaves the enemy dusted.

Turn 4 alternative


After the battle and actually after turn 4 I immediately thought I should have moved the eagle into a blocking position to prevent the crossbowmen from getting into the flank of the Phoenix guard. Obviously this would have allowed them to win their combat perhaps quicker but then again it also raises the question if the crossbowmen and BSB would have eventually got into the archers to support the Captain on Pegasus and swung that combat. Certainly brings up a point though in regards to me placing my eagles a little better.

Well, that's how ye olde 8th edition was. :) Thanks to Todd for being a gracious sparring partner across the battlefield from me and still continues to be today under different systems.

Until Battle 2!